
This is our ultimate guide on how to use Google My Maps to Plan a Road Trip.
Although a road trip is beyond exciting, sitting down and planning it gets tedious.
My best friend and I embarked on a road trip across the country a few years ago. And wow, the logistics were more complex than I thought. We had to meet numerous times to plan our itinerary.
I wish we’d known about Google My Maps. It would’ve saved much time, screenshots, and too many printouts.
That’s why we’ve compiled this guide on using Google My Maps to plan your next road trip. Hopefully, it’ll help you save time. Maybe it’ll even inspire you too!
The 4 Simple Steps – How to Use Google My Maps To Plan A Road Trip
- Log into Google Drive, navigate to Google My Maps; “Rename the Untitled Map“
- Add Location Pins by Searching and clicking; “Add to Map”
- Add Layers to keep your many pins organized; “Add New Layer”
- Add Driving Directions by clicking Pin B and clicking “Get Directions to Here”, then clicking Pin A
For trips longer than 10 destinations (long excursions with many destinations), consider creating the entire route in Google My Maps, then using Google Maps to get driving directions to up to 10 pins at a time.
Now let’s jump into more details.
- The 4 Simple Steps – How to Use Google My Maps To Plan A Road Trip
- Why Google My Maps Is Great for Road Trip Planning – How to Use Google My Maps To Plan A Road Trip
- 1. Create a New Map – How to Use Google My Maps To Plan A Road Trip
- 2. Add location pins – How to Use Google My Maps To Plan A Road Trip
- 3. Adding Layers – How to Use Google My Maps To Plan A Road Trip
- 4. Adding Driving Directions – How to Use Google My Maps To Plan A Road Trip
- How to Hack the 10-Destination/Layer Limit – How to Use Google My Maps To Plan A Road Trip
- Google My Maps vs Google Maps – How to Use Google My Maps To Plan A Road Trip
- Conclusion – How to Use Google My Maps To Plan A Road Trip
- Frequently Asked Questions – How to Use Google My Maps To Plan A Road Trip
Why Google My Maps Is Great for Road Trip Planning – How to Use Google My Maps To Plan A Road Trip
If you’d rather learn how to use Google My Maps, feel free to skip to the next section.
But for those wondering what the fuss is all about, let’s talk about what makes Google My Maps such an awesome tool for trip planning.
Great for Visual Learners – Why Google My Maps Is Great for Road Trip Planning
The location pins let you know how far apart your destinations are. Seeing what 112 miles looks like on a map is much different than just reading the number.
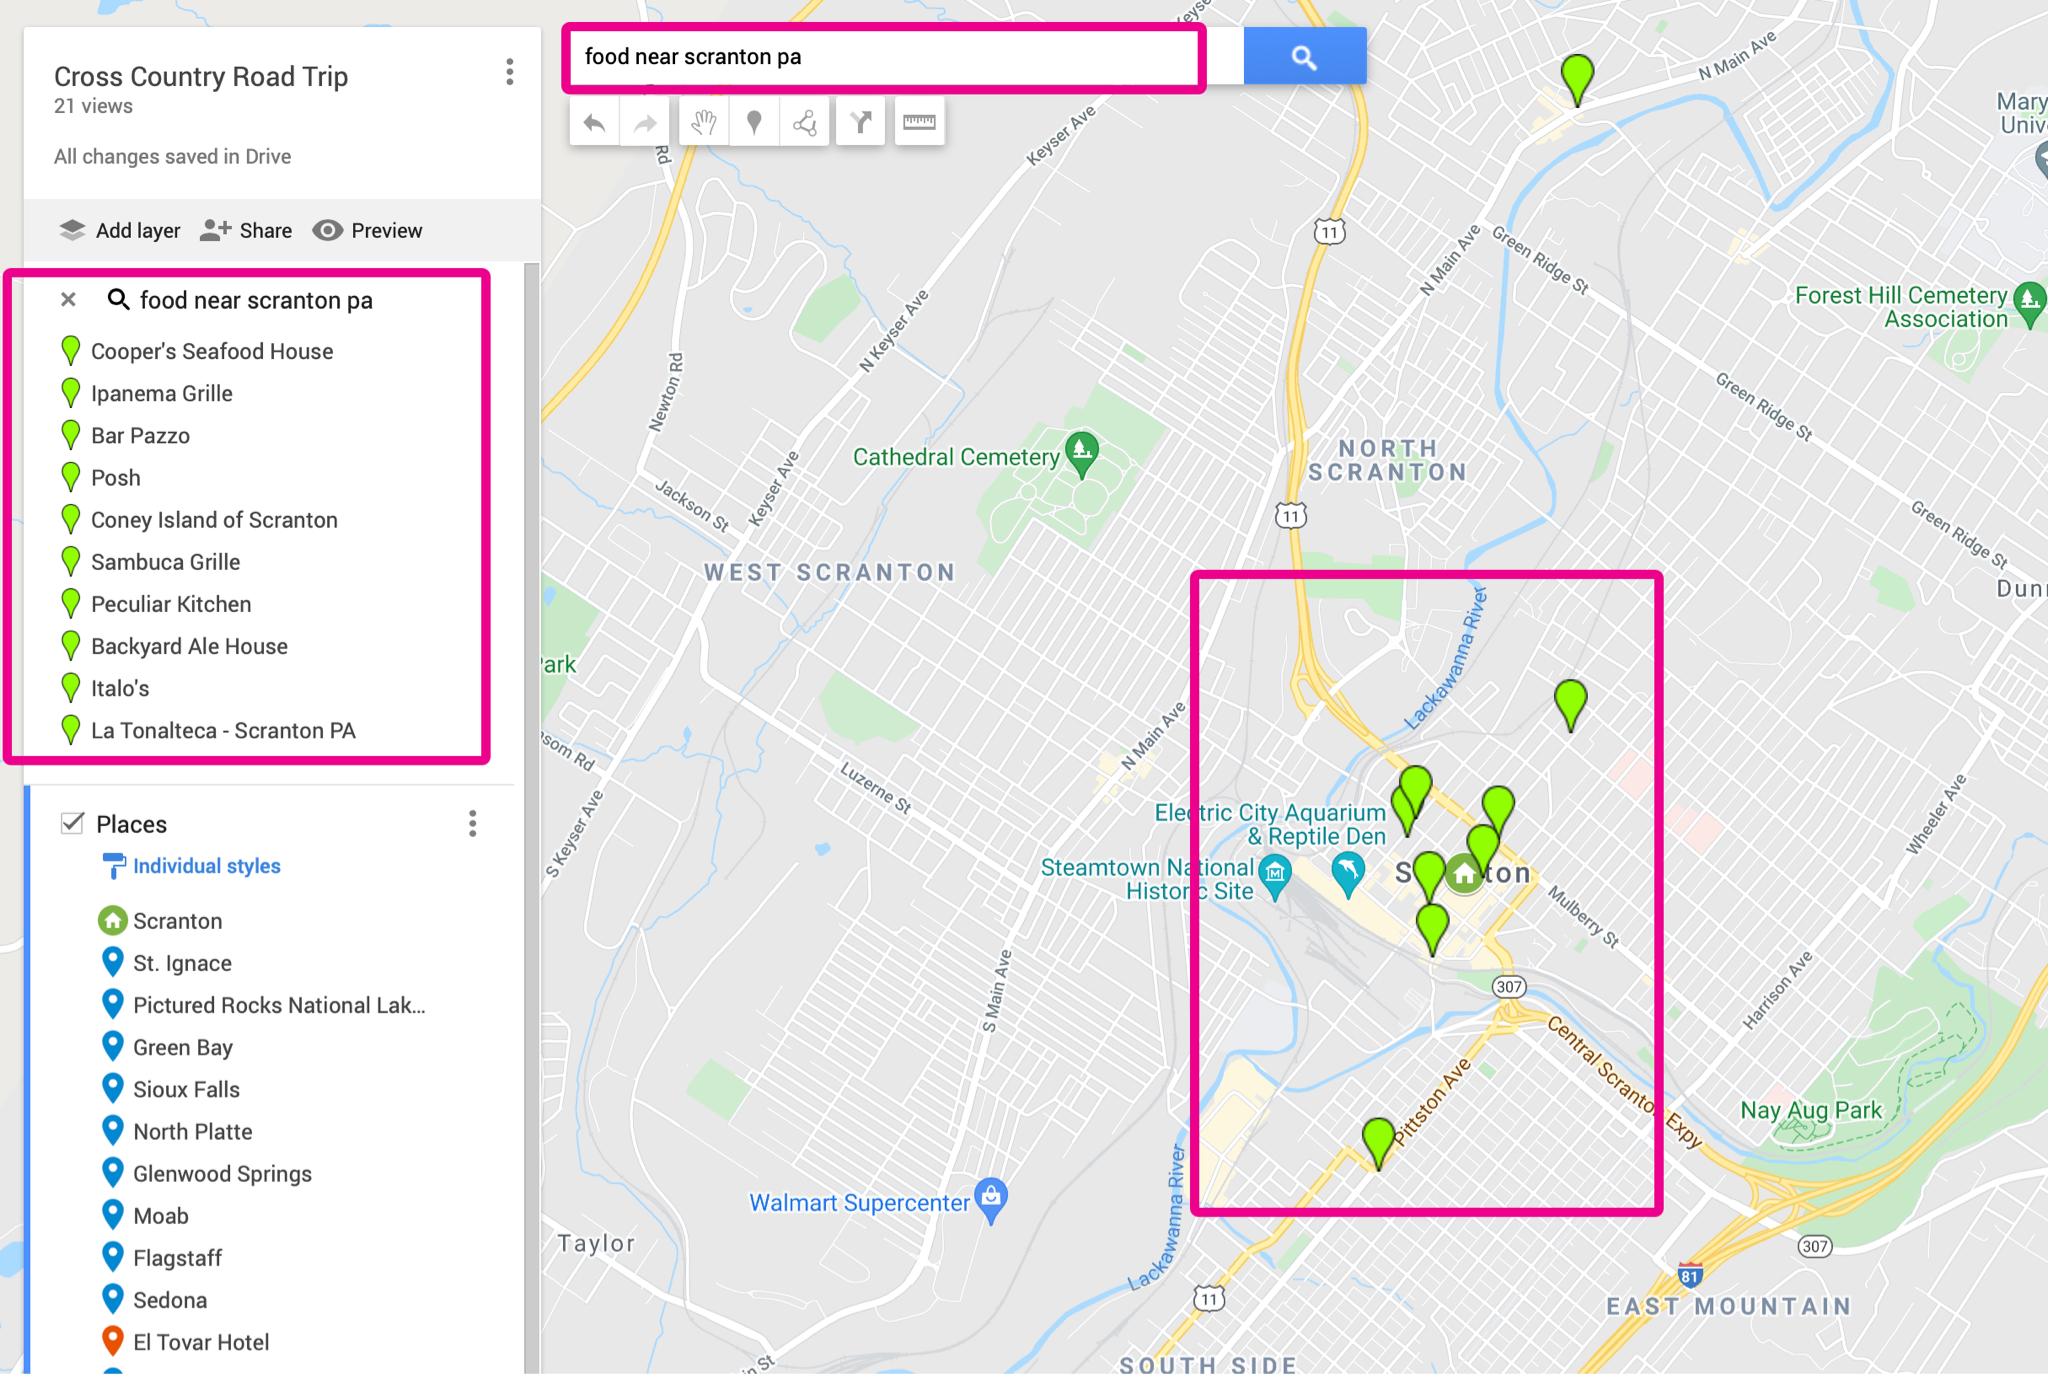
The below image shows an example of the location pins in action. This is a map of my cross-country road trip, which we’ll build together later in this guide.

Highly Customizable – Why Google My Maps Is Great for Road Trip Planning
Don’t fret if you already envision drowning in hundreds of blue (and indistinguishable) pins, don’t fret. Google My Maps lets you customize the colors of all your location pins.
In the first example, you’ll notice I set my starting and ending pins to be green and red.
You don’t have to limit yourself to 2 pins, though. You might choose to make all your restaurant pins red. Or maybe you’ll color-code the pins by day. The possibilities are endless!

Feel free to change the title or add a description for any location pin.

You can even add handy reference notes and photos.

Great for Brainstorming – Why Google My Maps Is Great for Road Trip Planning
Because you’re utilizing Google’s massive database, you can access all that information in Google My Maps.
In the previous images, we’ve been hovering over Scranton. So, typing “food near Scranton, PA” loads a handful of Scranton restaurants into your map and sidebar.
All of this is great because you don’t need to run separate Google searches for food.
You’d only run a separate search when you’re ready to get more in-depth. For example, “Best Restaurants in Scranton for Italian Food.”
Easy to Share Between People and Devices – Why Google My Maps Is Great for Road Trip Planning
You can share your map with your traveling buddies through a Google link. Or, opt to share it through Google Drive instead.
Not only that, but you can also give your friends editing access. This way, they can add their top destination picks too.
Finally, it’s easy to hop between a computer and a phone. In just three taps, you can instantly load all your pins, notes, and customization for easy viewing on the go.
1. Create a New Map – How to Use Google My Maps To Plan A Road Trip
Log into Google Drive, then under “My Drive,” select “More.” This will open another dropdown menu. From there, click “Google My Maps.”

This is what you’ll see: a blank map, ready to be populated with all sorts of goodies.
Click on the “Untitled map” to change the name to whatever you’d like. For this demo, we’ll recreate the Cross Country Road Trip map I showed you earlier.
So that’s what we’ll go ahead and name this map.
Notice how you can also give your map any description you’d like.


2. Add location pins – How to Use Google My Maps To Plan A Road Trip
So what are location pins? These handy dandy things are points on the map that mark a location, restaurant, hiking spots…you name it!
Plus, you can drop them literally anywhere. No, really – you can even drop a pin based on longitude/latitude coordinates.
Most of you won’t need to get that nitty gritty. This is large because adding a pin is as simple as typing it into the search bar.
Let’s see how it works, shall we?
So, for the Cross Country Road Trip map, I want to add Scranton, PA, as my starting point. Of course, if you’re following along, feel free to set your starting point to whatever you’d like.
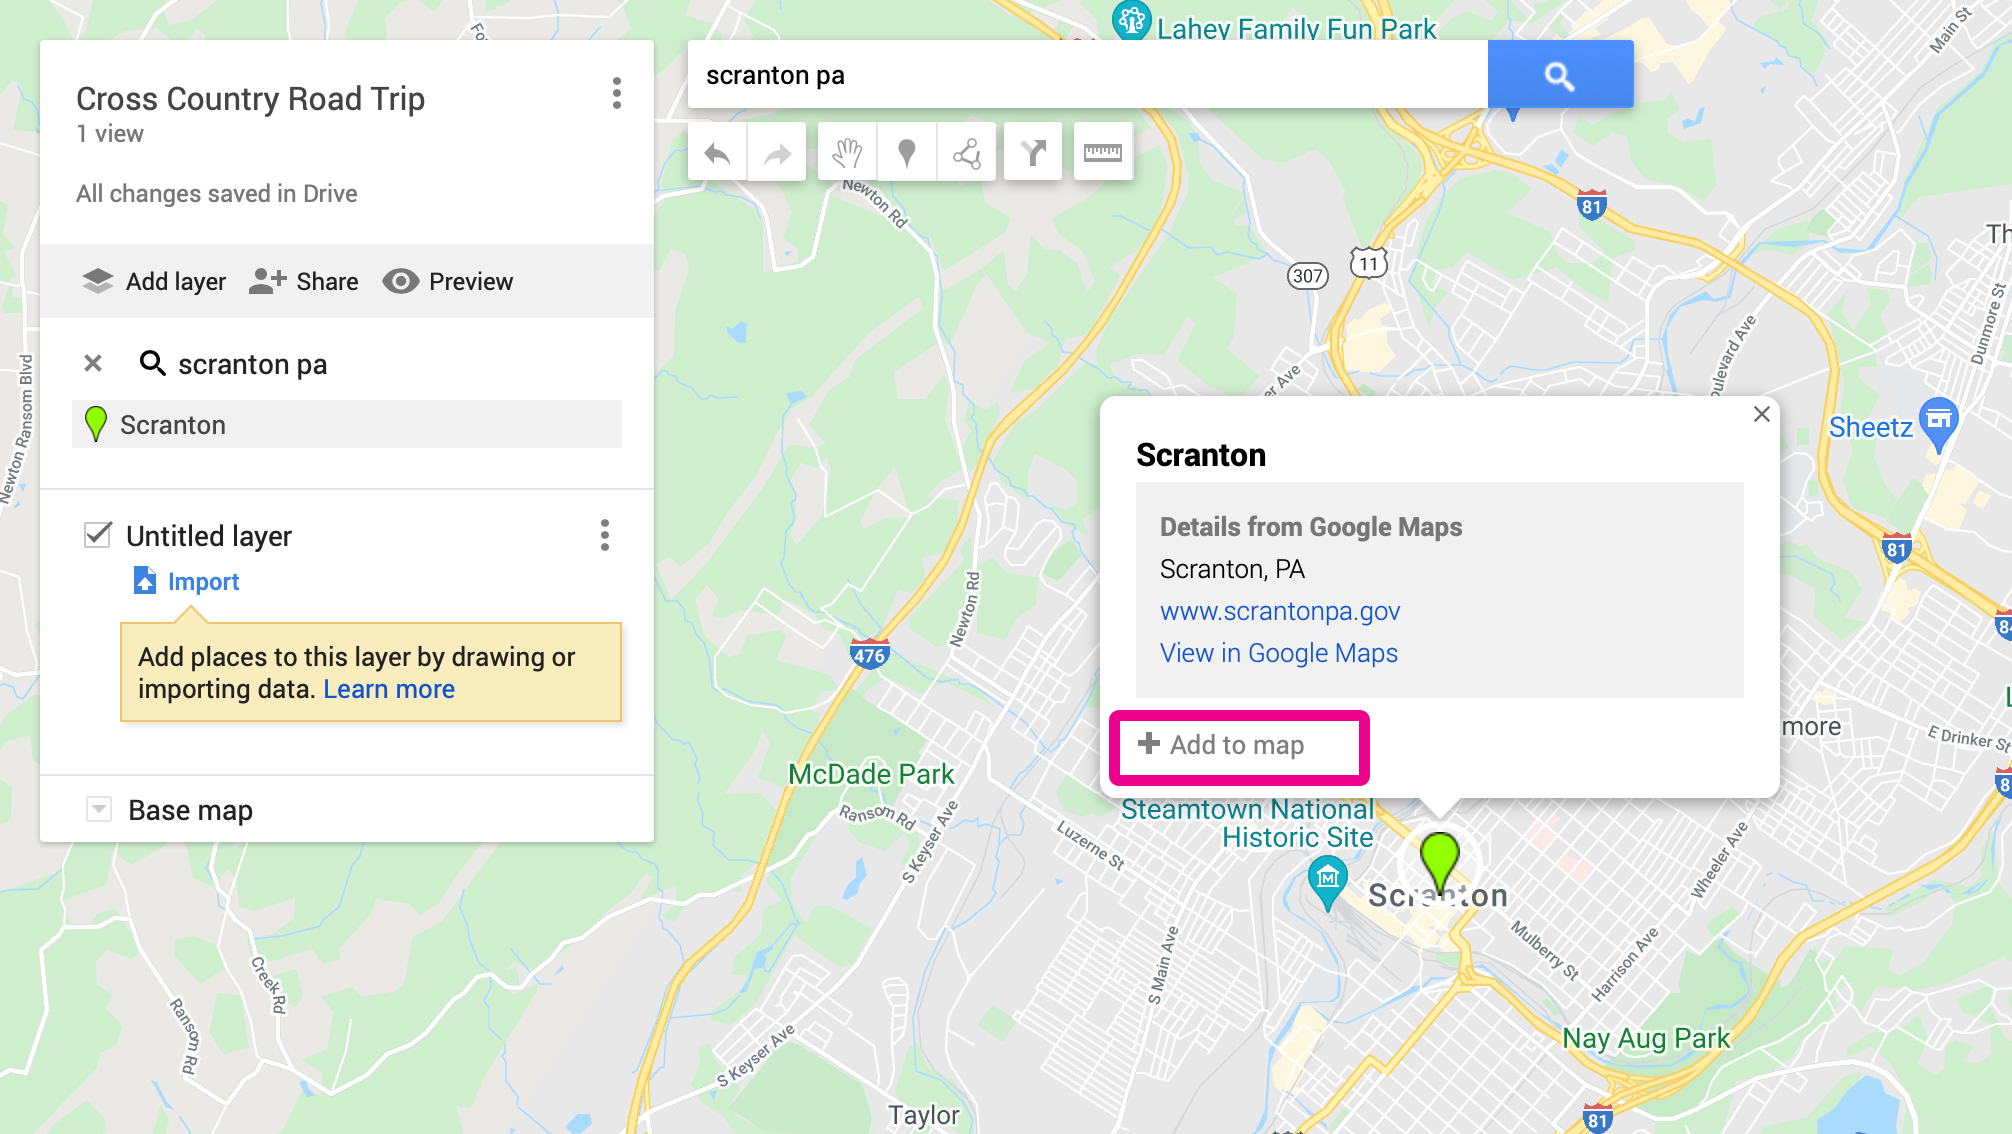
You go to the search bar and type in “Scranton, PA,” and Google does the rest.
Notice how it drops a bright green pin on Scranton. Scranton’s location pin hasn’t been added to your map yet.

You have to do that yourself. Just click the “Add to map” button and you’re all set.
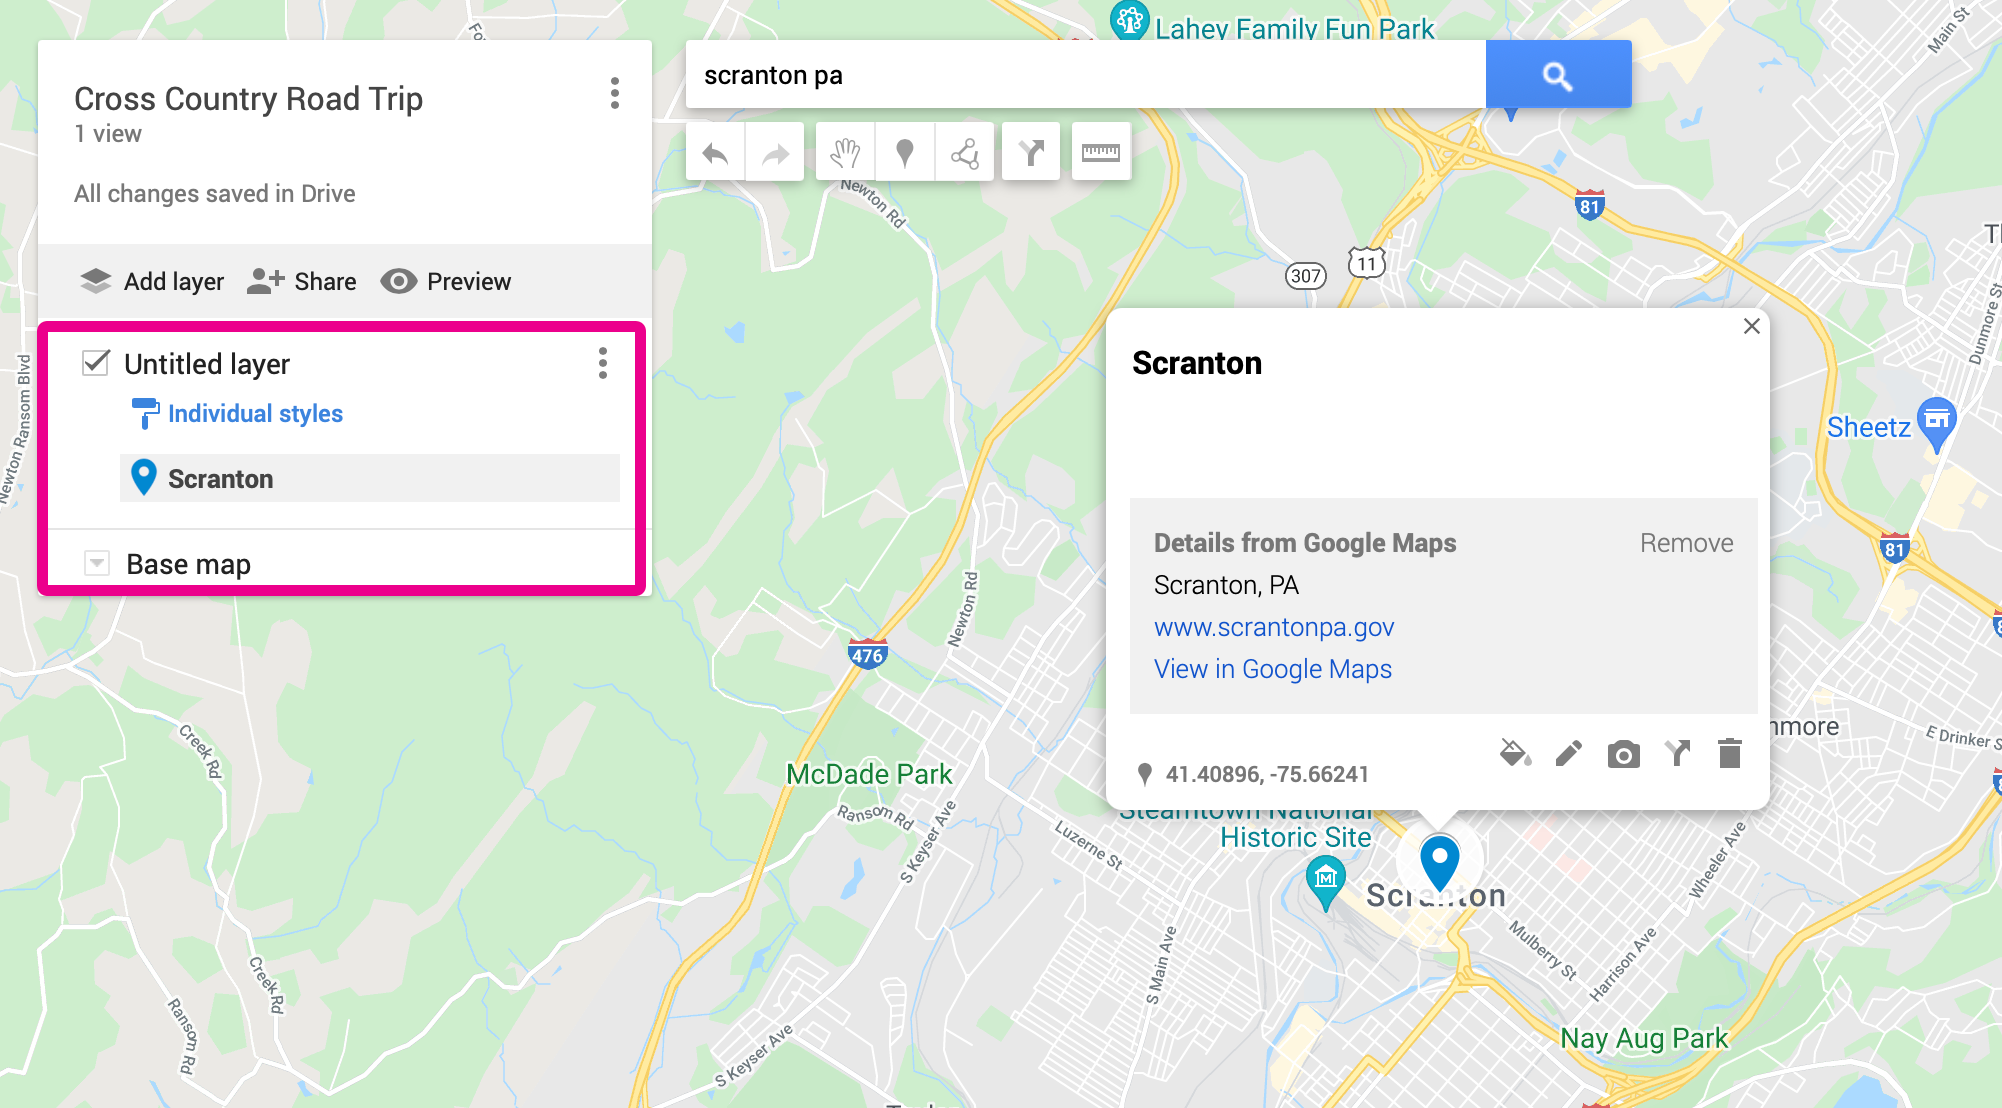
Great! Your pin has been added. See how it shows up on the map as a blue marker. And also, note that it’s in your sidebar now as well.
Here’s where things get really fun for those color-coordinator nuts among us!
To customize a location pin, click on the pin. This opens a box with all sorts of color swatches. Feel free to make your pin whatever color you’d like.

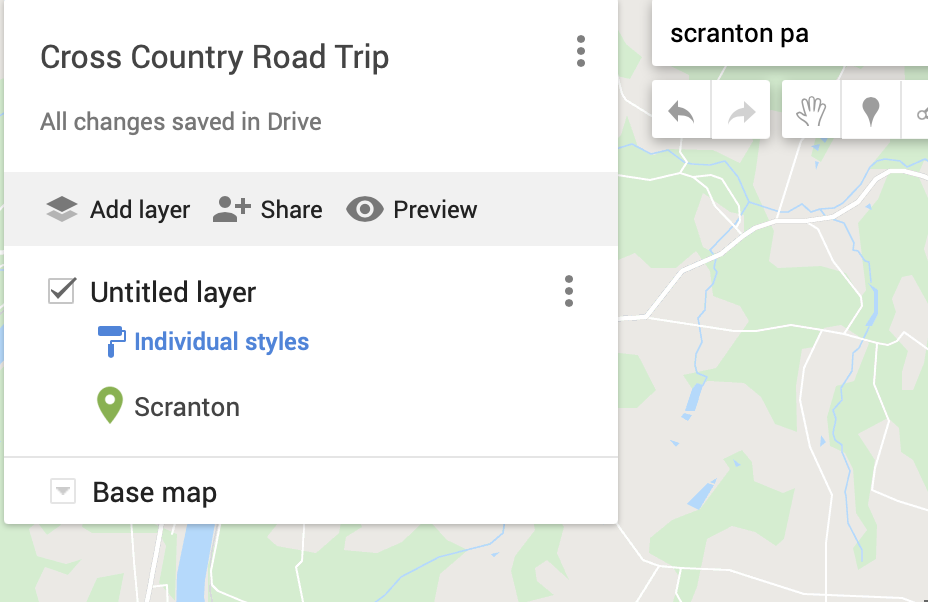
For the purposes of this example, I’m going to go ahead and make my Scranton pin green to signify the starting point of the journey.

Don’t forget that within that customization box is a range of cool icons. If you click “More icons,” you have even more to choose from! An almost dizzying amount, as a matter of fact.
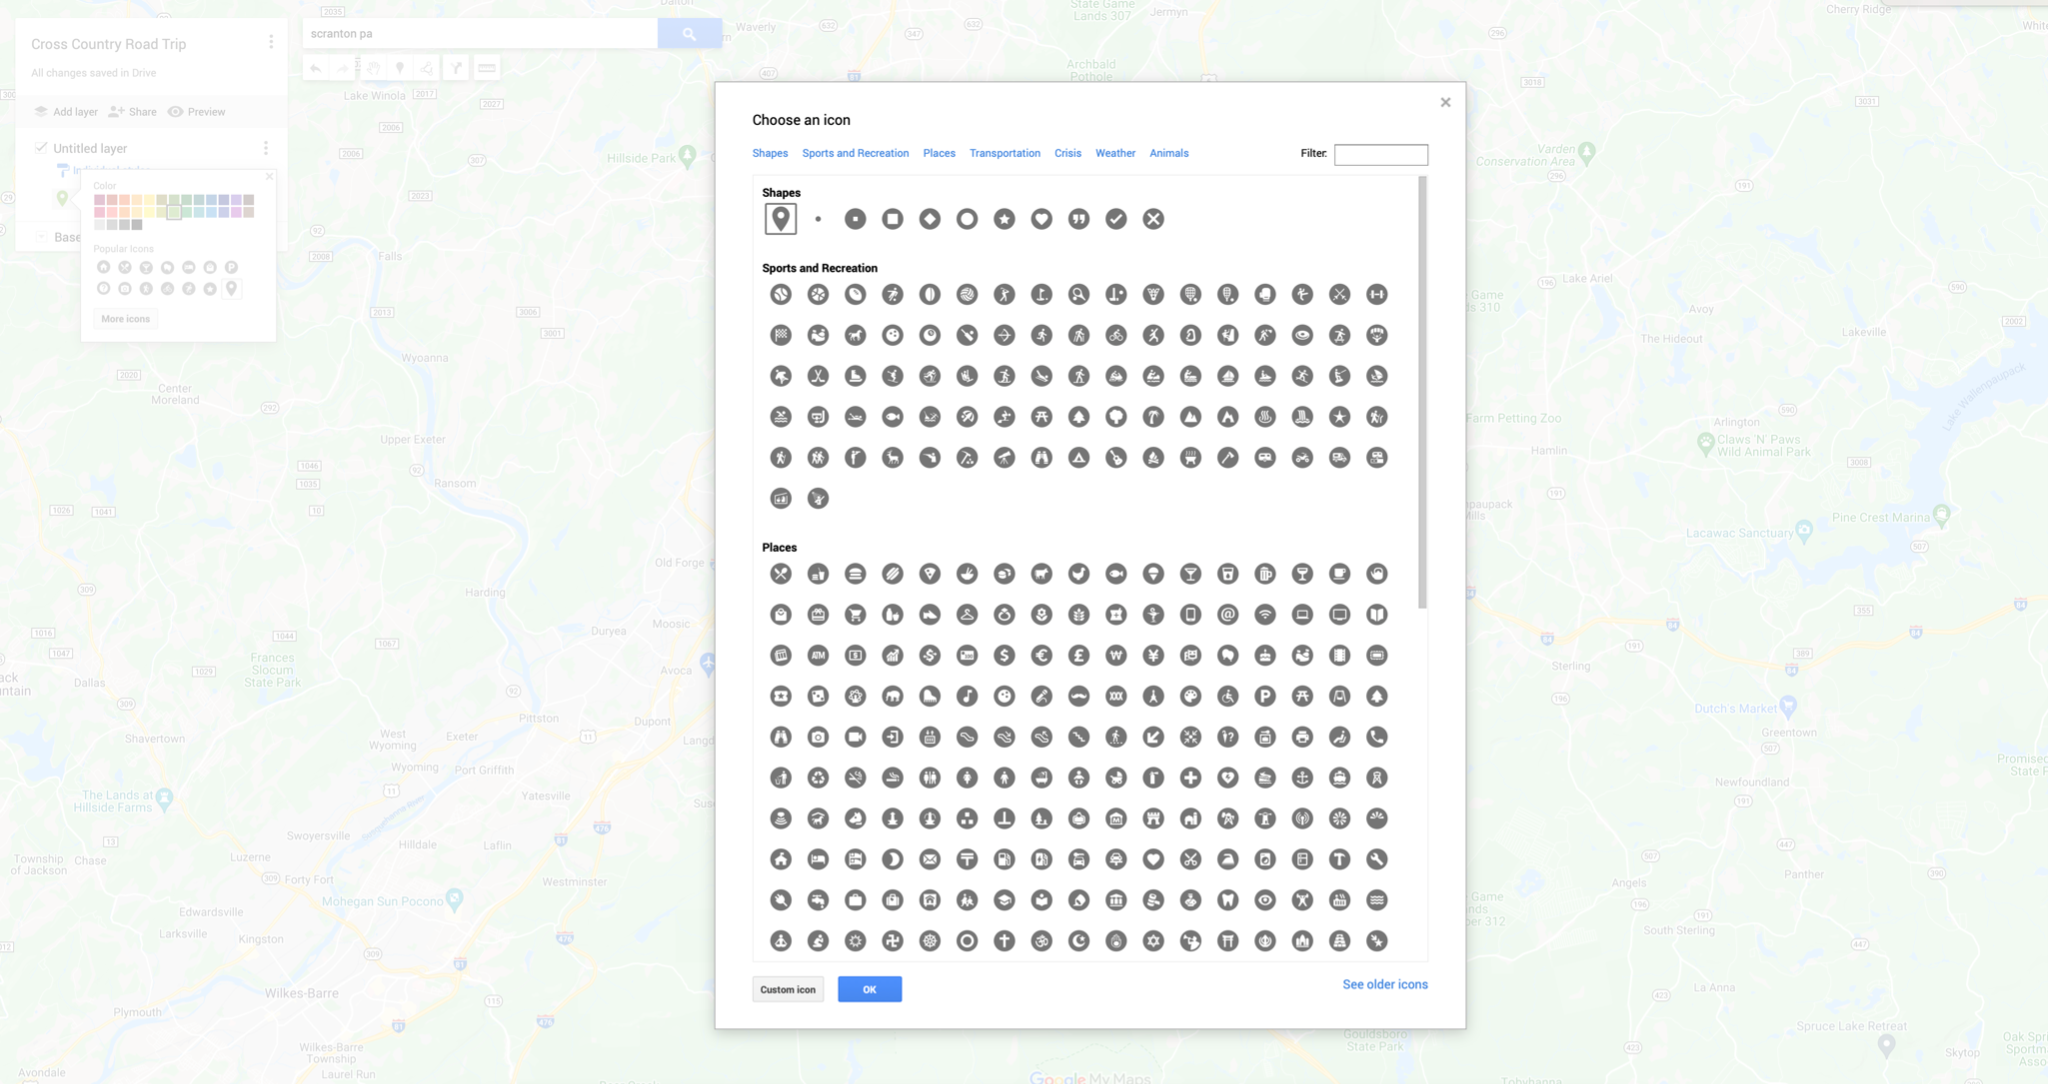
I’ll set my Scranton pin as a home icon, but you can choose any. As you can see, there’s an icon for any destination or activity.
3. Adding Layers – How to Use Google My Maps To Plan A Road Trip
Layers are a useful feature for keeping your pins organized for different categories.
Sure, it doesn’t sound like a big deal now. But once you start racking up tons of pins, your main layer will quickly get messy!
You can add a layer to sort your pins by category. For example, one layer can contain pins of restaurants you want to try. Or another layer can be dedicated to hotels.
Some users like to sort their pins by day. In this case, you’d group each day’s hotels, restaurants, and activities into a Day 1, Day 2, etc layer.
One word of warning: you can add 10 layers maximum. So if you plan on grouping by day, but you have a trip longer than 10 days, well, you’re out of luck.
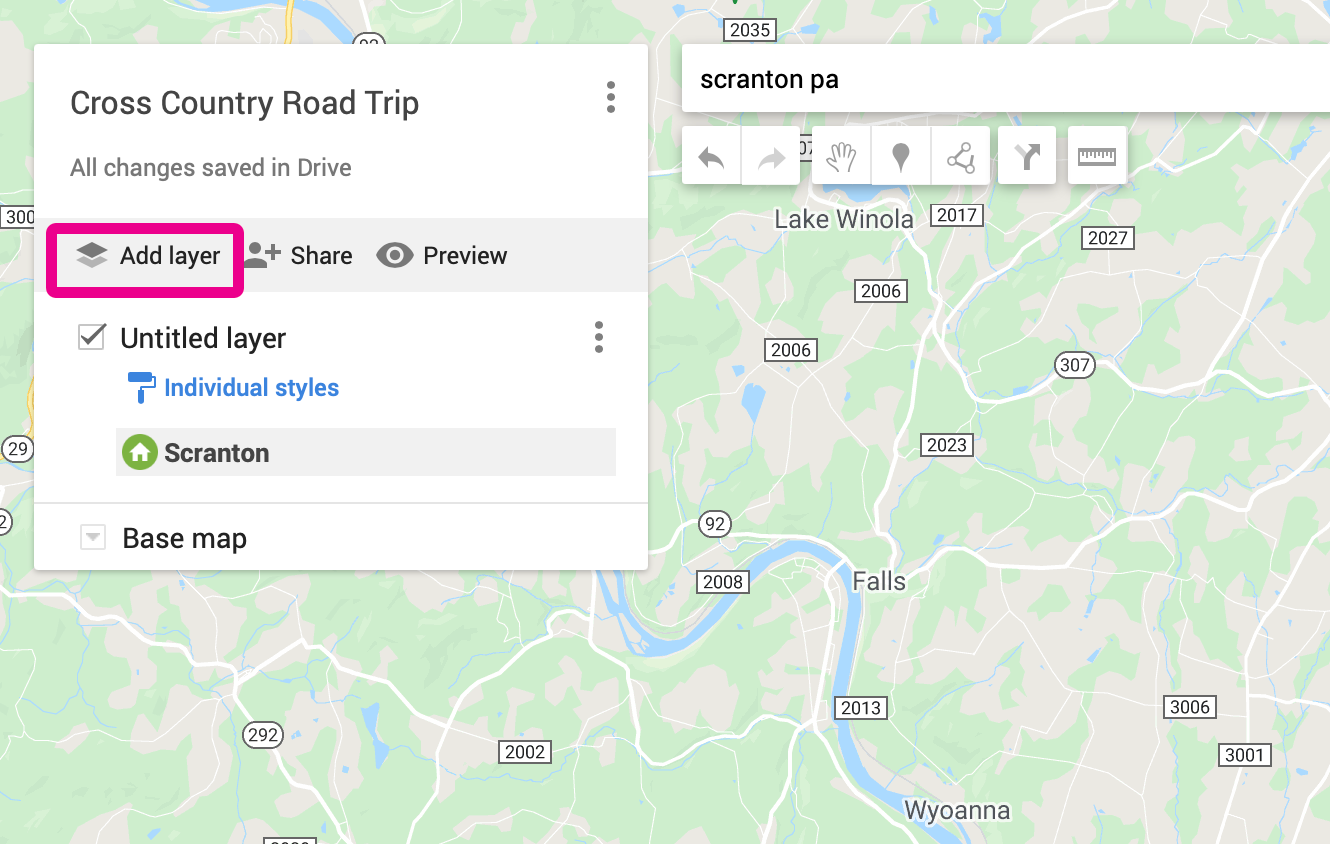
Click the “Add layer” button in your sidebar to add a layer.
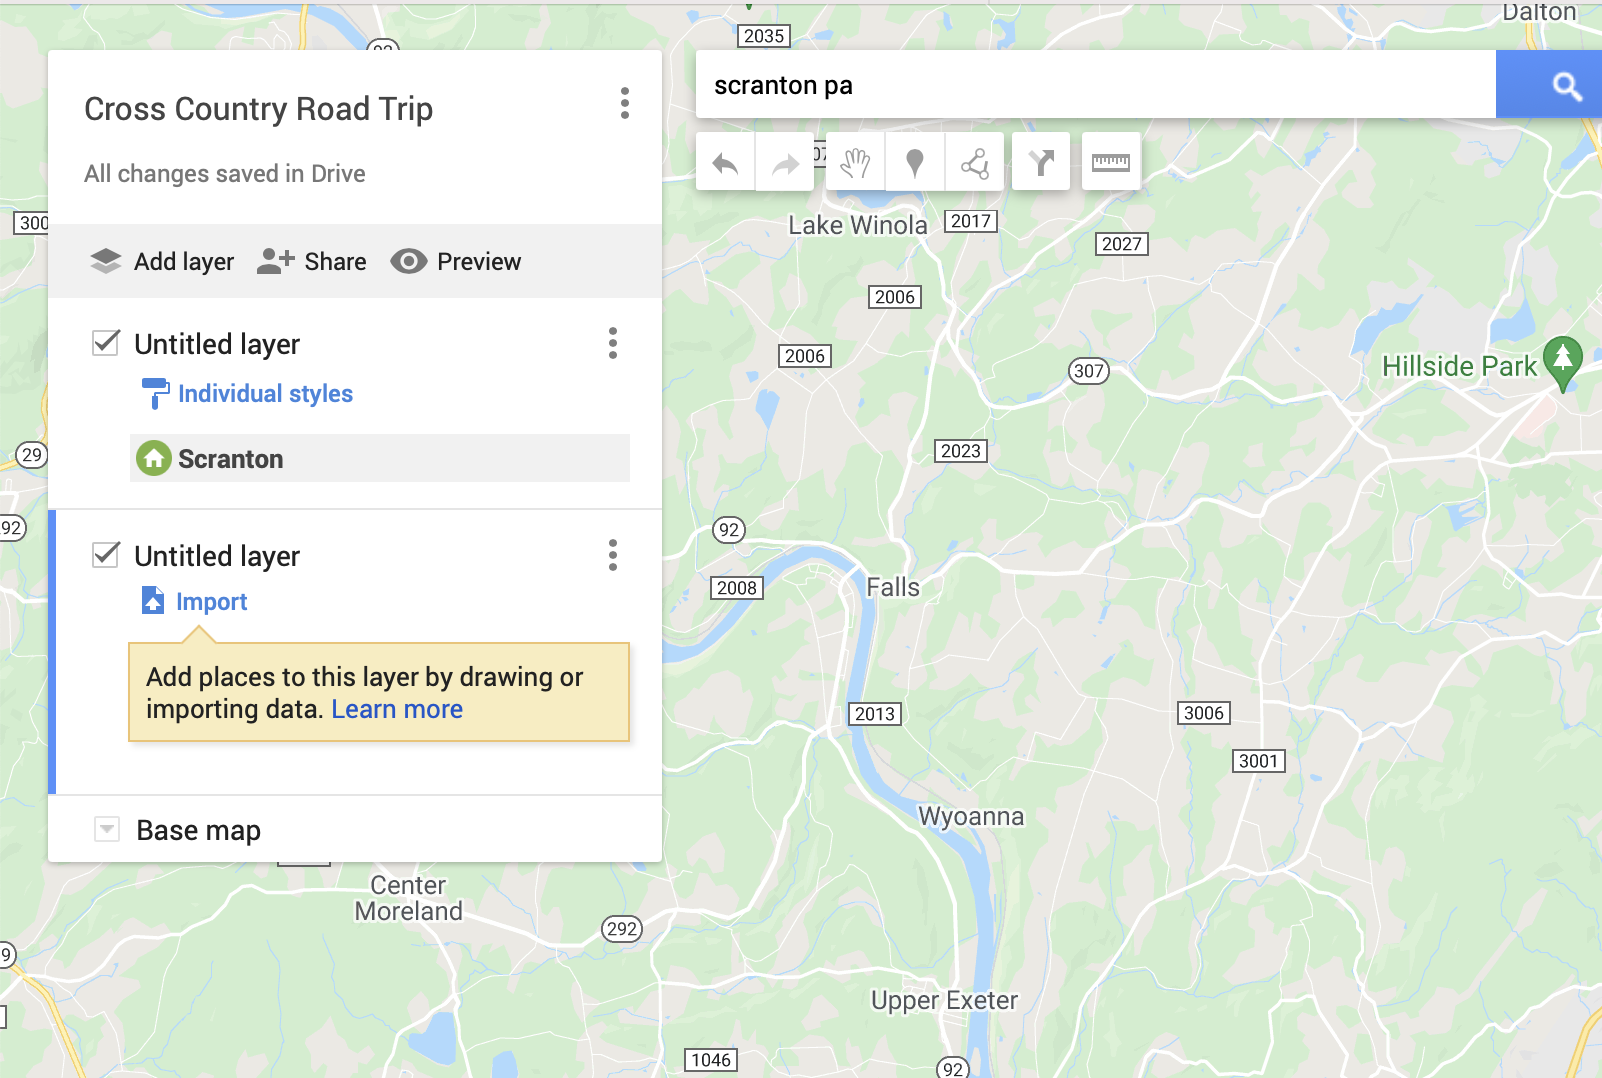
Now you’ll see your next layer drop in beneath your original layer.
Using Layers – Adding Layers
Once you’ve added your layers, it’s time to learn how to work with them.
Let’s say you want to move a pin to a different layer. To do that, drag your pin to the new layer.
The only exception to this is if you’re trying to move a pin to a driving directions layer.
Uncheck the boxes next to each layer’s name to turn a layer invisible. To make it visible again, repeat the process.

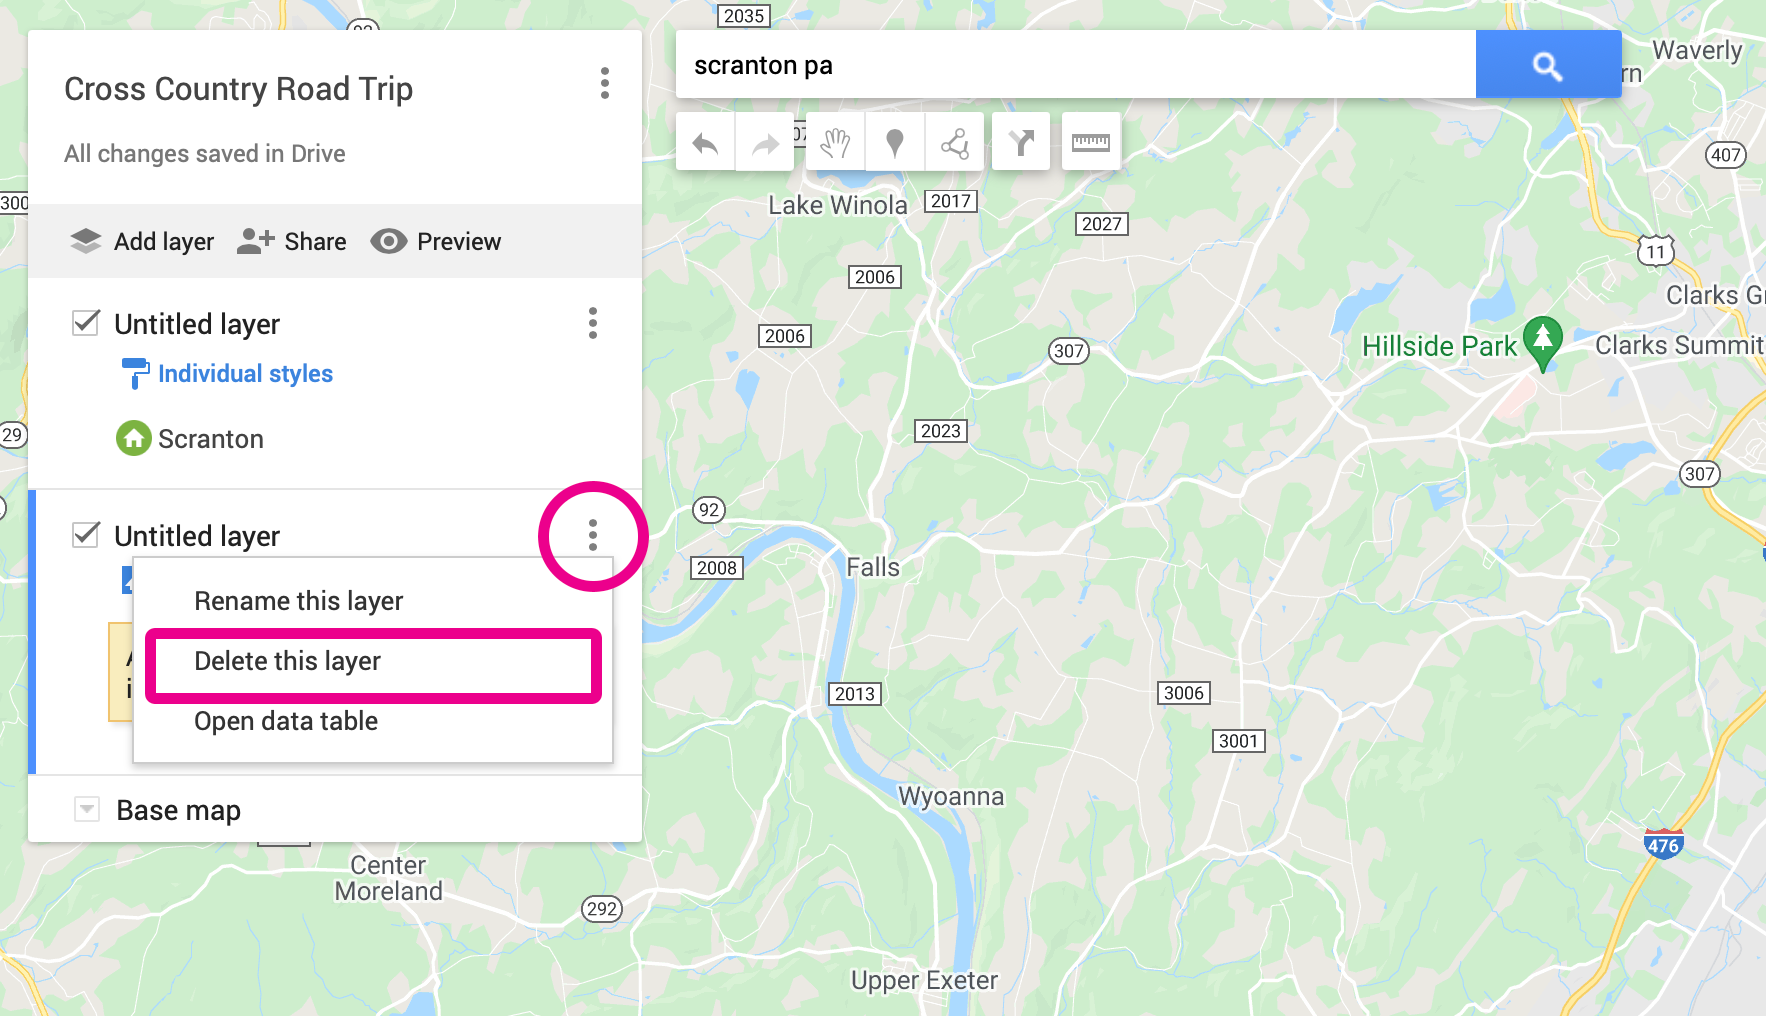
If you don’t need a layer anymore, click the 3 dots next to its name and click “Delete this layer.”
4. Adding Driving Directions – How to Use Google My Maps To Plan A Road Trip
A little while back, I mentioned a driving directions layer. I also mentioned that Google My Maps’ driving directions aren’t the best.
But if you want to see that familiar blue line tracing your route, you’re in luck.
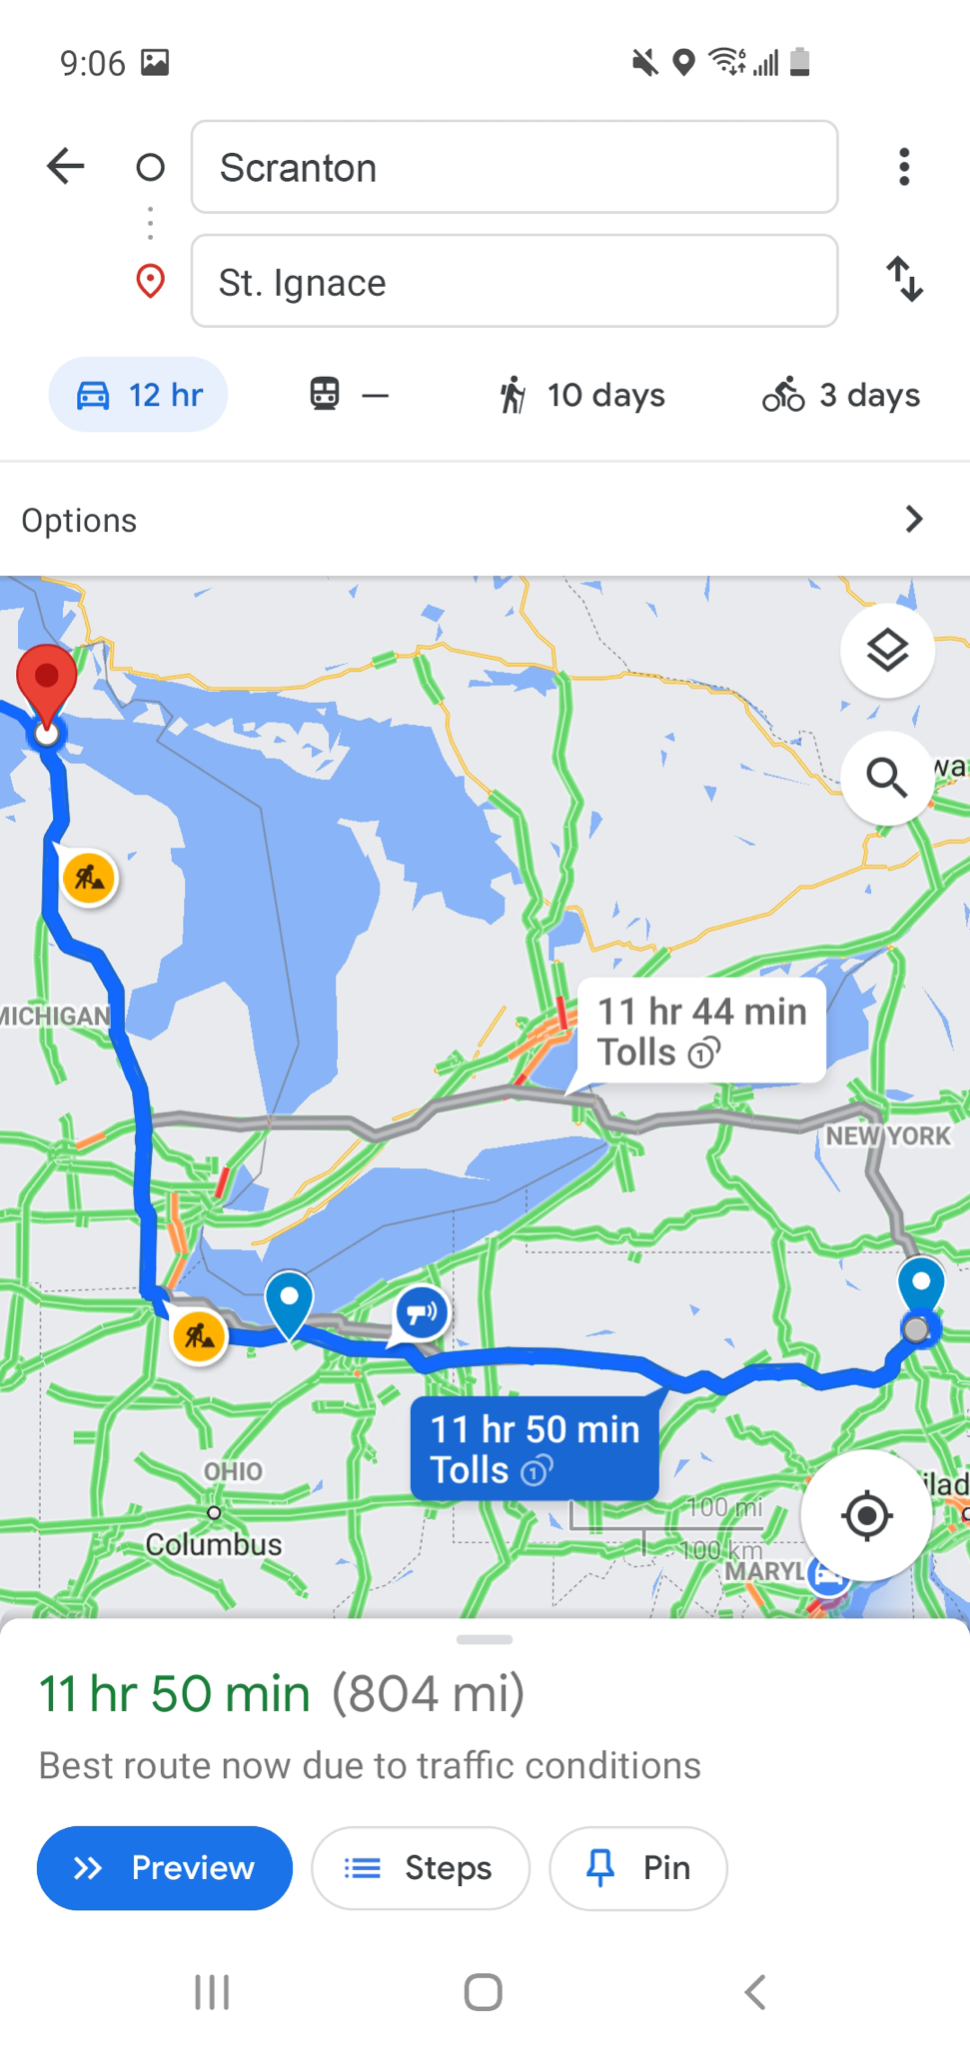
In my map, I’ve added St. Ignace, MI, as my 2nd destination after Scranton. So, you’ll click that 2nd pin first.
When the pin info box opens, click the “Get directions to here” icon.


Notice how “A” and “B” have been added in your sidebar. But “A” is still blank.
We recommend typing the name of your previous pin into this box. You can also click-drag your map to the pin, but we found that to be a less precise method.
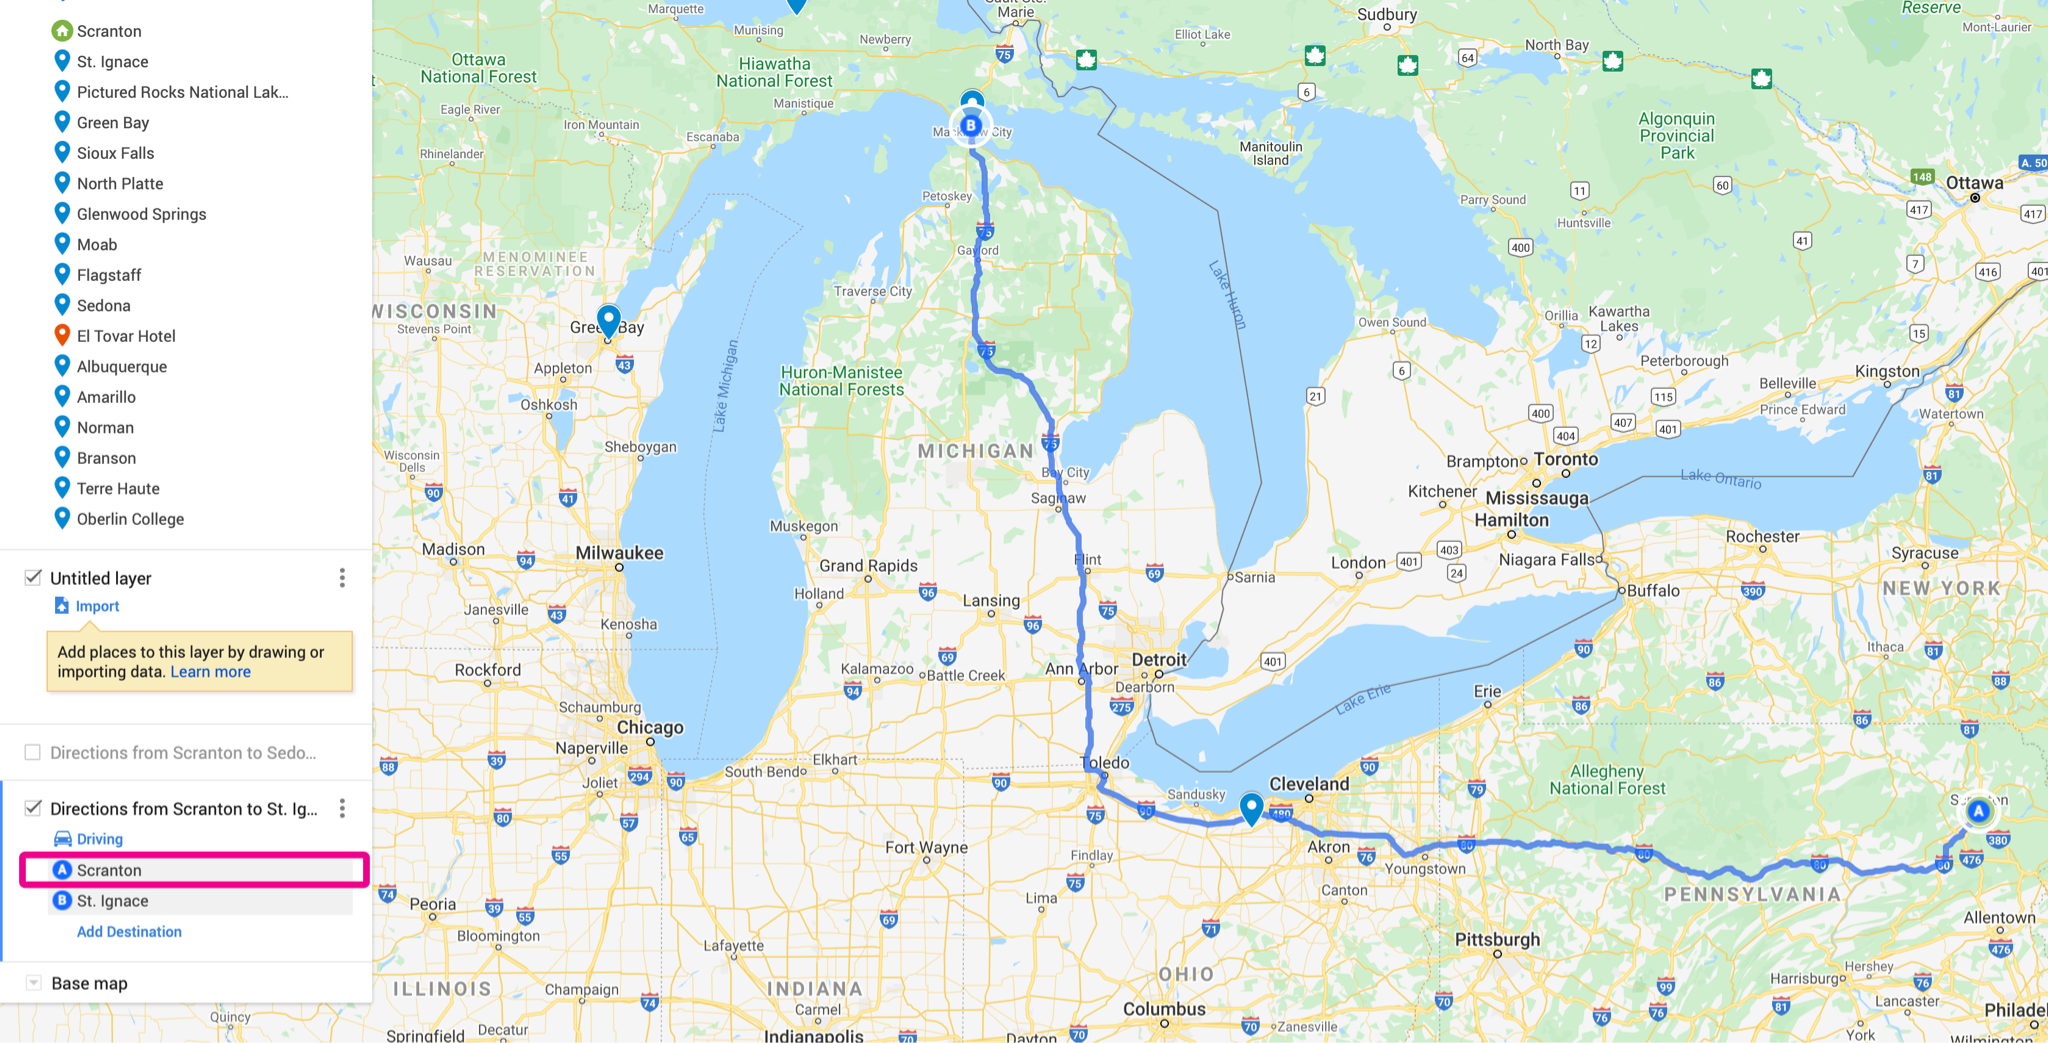
Now your directions from pin A to pin B have appeared.
I’ve gone ahead and repeated this process for the other 9 destinations.

But hold up, what if you have more than 10 destinations? Unfortunately, Google My Maps limits you to 10 driving destinations, despite the fact that you can have thousands of pins.
Note on my map where I’ve plotted out a lot of pins. But I ran out of space to drive home!
How to Hack the 10-Destination/Layer Limit – How to Use Google My Maps To Plan A Road Trip
So now is a great time to discuss the limitations of Google My Maps.
As we just saw, all maps are given a 10-destination limit for driving directions.
Thankfully, there are ways to get around that.
Google My Maps and Google Maps have some integration. So the content you create in Google My Maps can actually be loaded into Google Maps.
And since we know that Google Maps is awesome for turn-by-turn directions, we can use that for navigation.
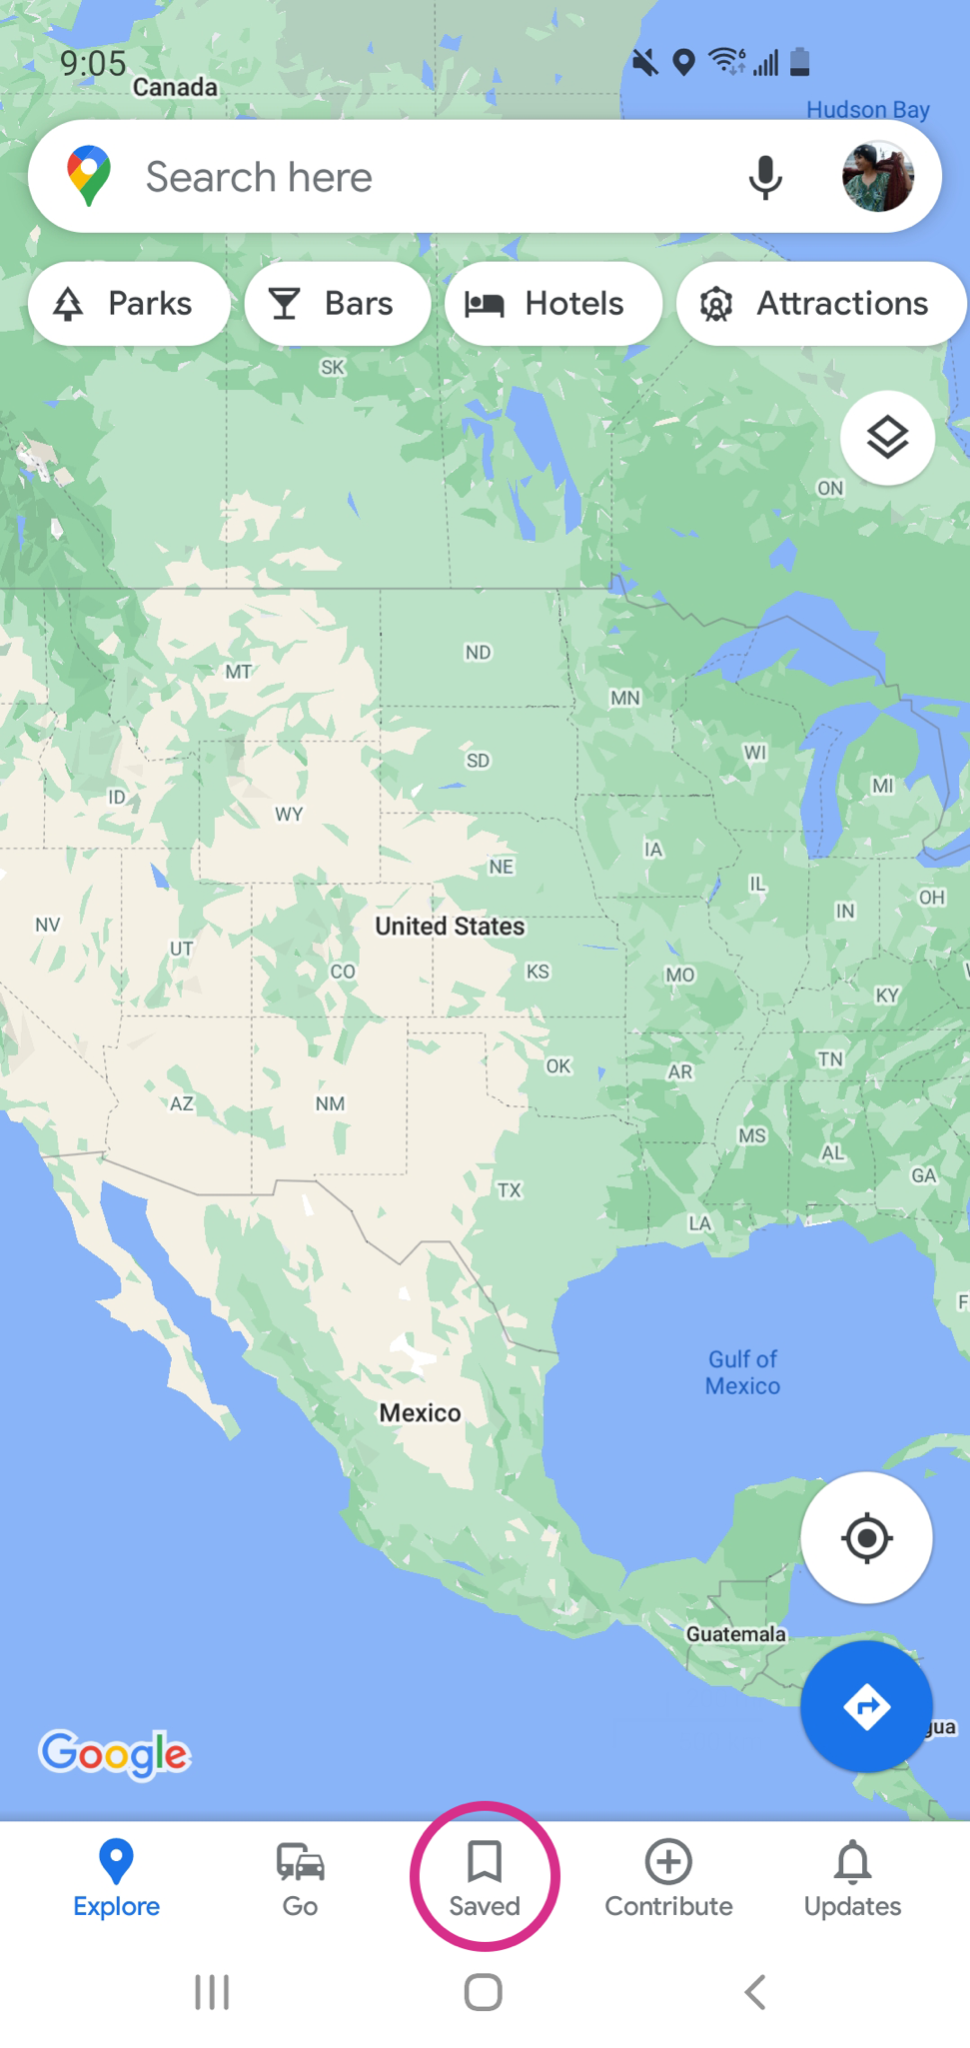
Simply open Google Maps on your phone (since you’ll be most likely on the road navigating) and tap “Saved” at the bottom of the app.
Then on the right, tap “Maps.”
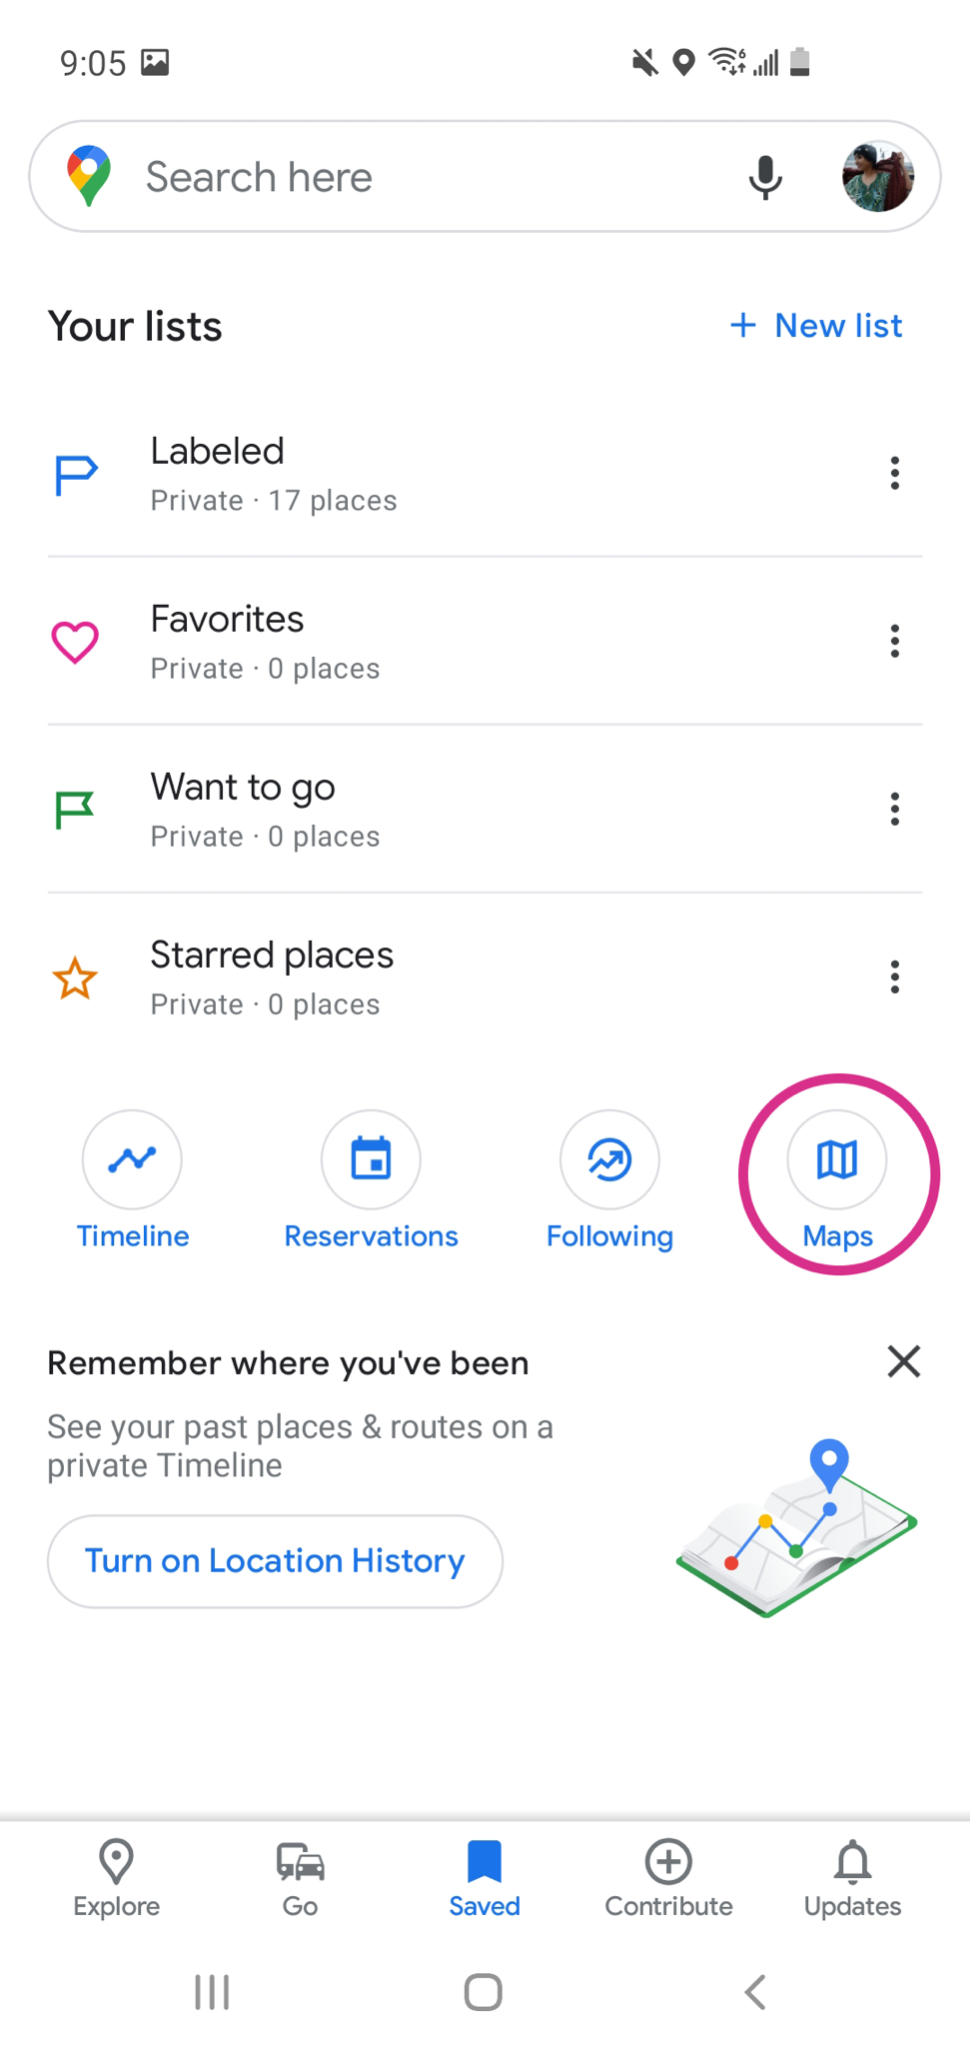
All the Google My Maps you’ve ever created or even looked at will load. Tap the Cross Country Road Trip to bring it into Google Maps.

Ta-da! Now the entirety of your map – including dozens and dozens of pins – is right at your fingertips.

This is such a big deal because you’ve got all your pins for every destination, attraction, and rest stop pre-dropped into your map. You don’t have to waste time planning this on the go because you already did it.
To actually load turn-by-turn directions from one pin to the next, click the destination pin you want to navigate to. In my case, this will be St. Ignace again.
Then tap “Directions”

As you did before, type in the name of the 1st pin you want directions from. We’ll go ahead and use Scranton again as our example.
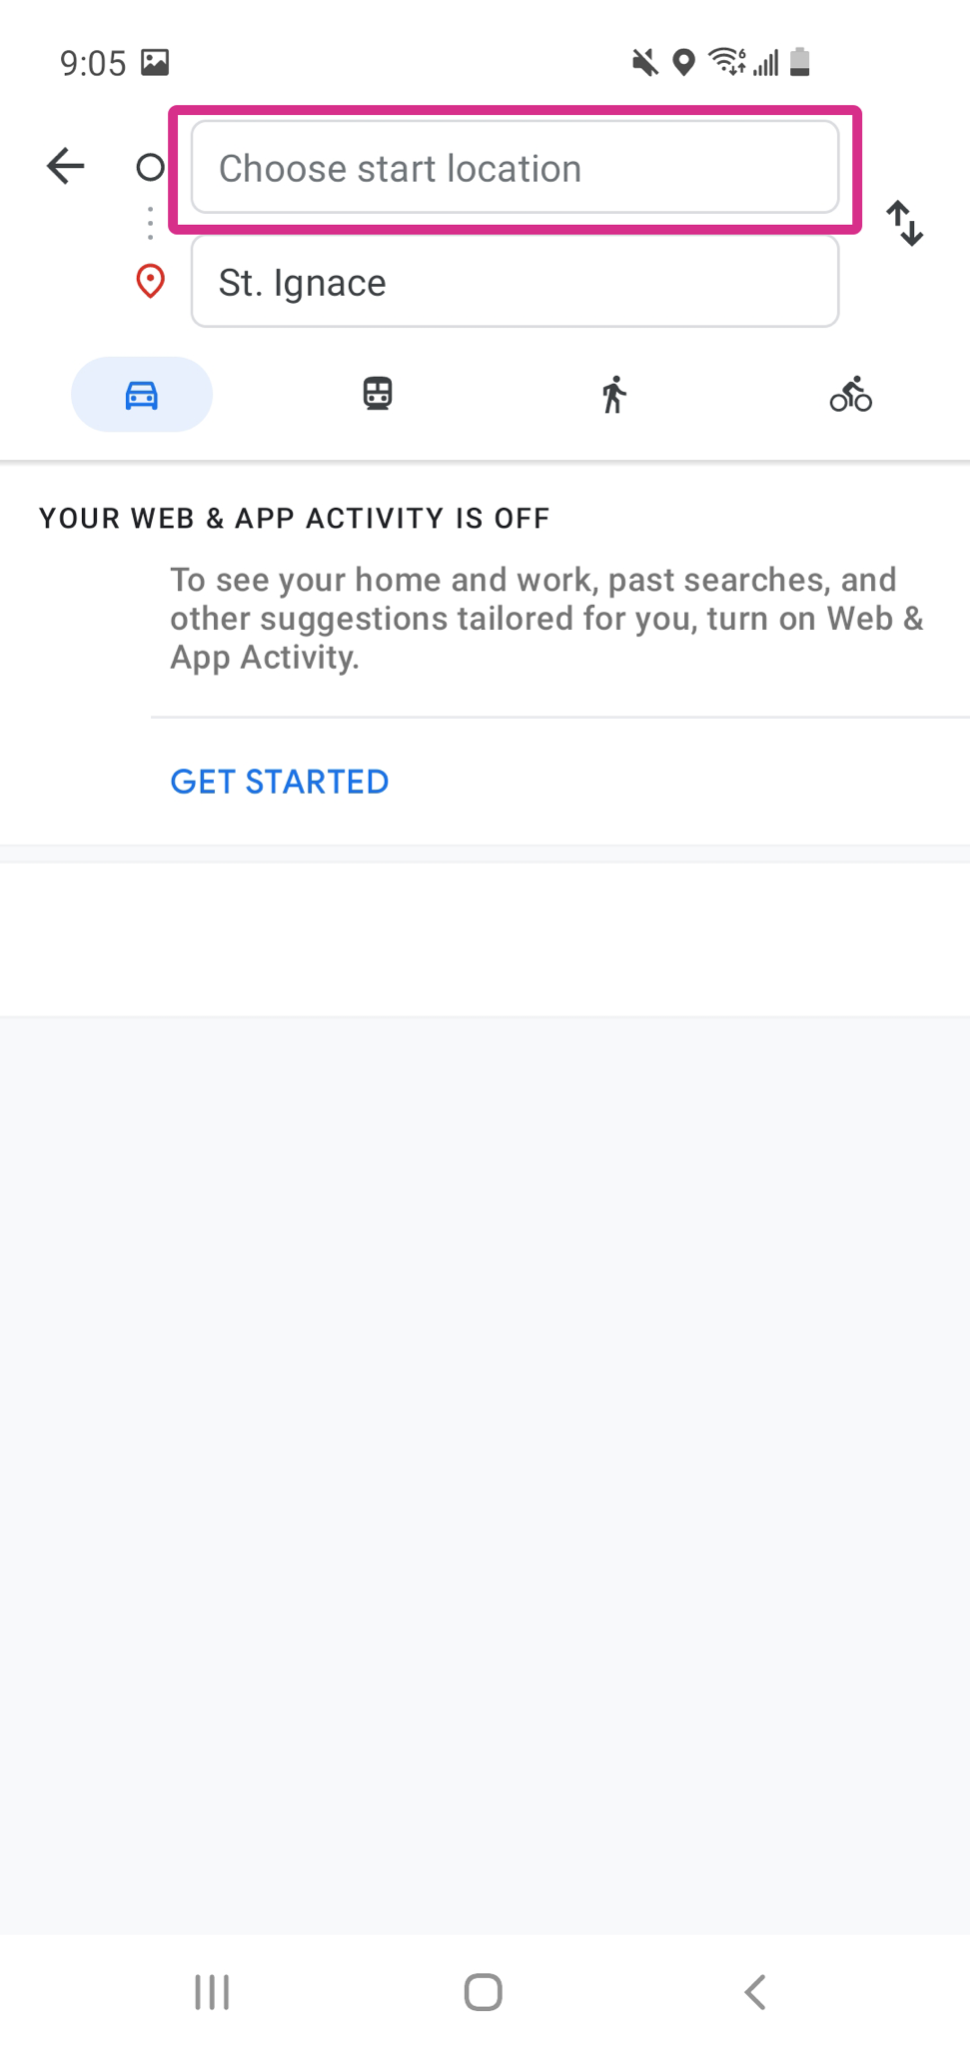
You only need to click your first two pins to get turn-by-turn driving directions.
So to summarize, this is the method we suggest – from start to finish – to build a large-scale road trip. First, build it in Google My Maps. Next, load the map into Google Maps. Finally, harness its powerful navigation to get you on your way.
Google My Maps vs Google Maps – How to Use Google My Maps To Plan A Road Trip
If all this back-and-forth between Google My Maps and Google Maps has got your head spinning, let’s back up and examine the differences between these programs.
Google My Maps – Google My Maps vs Google Maps
As we’ve seen, Google My Maps is amazing for planning long, complex routes. And I mean really complex – up to 10,000 pins, as a matter of fact.
Its ability to customize your map is unrivaled as well. From color-coding each and every pin to sorting the pins on custom layers, the possibilities are as endless as your road trip destinations.
But it’s not so amazing at turn-by-turn directions despite having directions as a feature. For this reason, we’d advise steering clear of those.
However, the driving directions are useful for roughly estimating how many hours it’ll take to get from point A to point B.
This was a question my friend and I asked so many times while planning our own road trip. “How long does it take to get from here to here? Can we make it in one day before we have to stop at a hotel?”
Another problematic thing about Google My Maps is its 10 driving-direction stops limit. This means you can only get directions (or time estimations) to 10 places out of, let’s say, 20 (or more!). Plus, this 10 limit carries over to the layers too.
Google Maps – Google My Maps vs Google Maps
On the positive side, this is where Google Maps can shine.
Unlike its cousin, Google Maps excels at turn-by-turn navigation. It’s a champ at getting you from Point A to Point B, no problem. You can even add multiple destinations, similar to Google My Maps.
But that said, Google Maps does come with some tradeoffs. The biggest one is that you don’t get those sweet customization options.
So we’d recommend Google Maps as a tool to use with Google My Maps.
Conclusion – How to Use Google My Maps To Plan A Road Trip
Google My Maps is clearly an extraordinarily powerful tool for planning your next road trip’s itinerary in advance.
Not only is it great for saving literally thousands of locations and stops, but you can harness the power of Google’s search engines to find more destinations along the way.
And you get oh-so-many customization features to make Google My Maps a snap for visual learners. Now it’s effortless to take in your map at a glance.
That said, sure, there are some annoying quirks. For one, that 10-stop limit is crazy frustrating.
But thankfully, we showed you a way around that. Using Google Maps to load your Google My Maps removes all the potential headaches.
When all’s said and done, we think the flexibility and customization of Google My Maps far outweigh any weaknesses.
We had a ton of fun researching this guide for you. It’s definitely made my feet itch to get on the road.
Hopefully, it’s done the same for you too! We wish you luck – and happy planning! – on your next road trip!
If you’d like more tips on trip planning, check out our library here!
Frequently Asked Questions – How to Use Google My Maps To Plan A Road Trip
1. How Do I Create a Custom Map Using Google My Maps? – FAQs
To create a custom map using Google My Maps, sign in to your Google account and navigate to the Google My Maps website. Click “Create a new map” and add your desired locations, routes, and markers to the map. You can also customize each marker’s colors, icons, and descriptions on your map.
2. Can I Share My Google My Maps with Friends and Family? – FAQs
Yes, you can easily share your Google My Maps with others by clicking the “Share” button and sending the link to your map. You can share the map with specific people or make it public for anyone to view.
3. How Do I Add Points of Interest to My Google My Maps Road Trip Plan? – FAQs
To add points of interest to your Google My Maps road trip plan, search for the desired location in the search bar on the left-hand side of the map. Once you find the location, click the “Add to map” button to add it to your map. You can add custom markers by right-clicking on the map and selecting “Add marker.”
4. Can I Access My Google My Maps Offline During My Road Trip? – FAQs
You can access your Google My Maps offline by downloading the map to your device before your road trip. To do this, open the map you want to download, click the three dots in the upper right-hand corner of the screen, and select “Download offline map.” This will save a copy of the map to your device that you can access without an internet connection.
5. What are Some Tips for Optimizing My Google My Maps Road Trip Plan? – FAQs
Some tips for optimizing your Google My Maps road trip plan include:
- Add your planned stops and points of interest to the map beforehand.
- Organize your markers and routes in a logical order that makes sense for your trip.
- Use color-coded markers or different icons to differentiate between different types of locations (such as restaurants, scenic viewpoints, or hotels).
- Take advantage of the “Directions” feature to easily plan the best route between your stops.
- Use the “Notes” feature to add important information or reminders for each location on your map.